I know, I know… starting a blog can be confusing. When I started my first blog over five years ago, didn’t know a THING about blogs or blogging.
I kept looking through Google for help, but all the guides I found were too technical and difficult to follow.
That’s why I wrote this guide. I’ve now managed over 20 different blogs, some with over 200,000 visitors, and I wanted to help beginners (like I used to be) do the same by giving them a super easy guide that I wish I had when I started.
In this guide, I’ll show you how to start a blog, including:
- Finding a blog topic (in case you don’t have one yet)
- Setting up a blog on your own custom domain name (like yoursite.com)
- Choosing a blog layout/theme (with a design you actually love…)
- Getting more visitors and couple of ways to monetize your blog
STEP ONE: Choose a Blog Topic
What should I write about?
To help figure this out, ask yourself a few questions:
1. Why am I blogging?
What’s your goal – making money? Showcasing your expertise? Sharing your life experience? Whatever you write about should line up with that goal.
When I start my first blog, I just wanted to write about smartphones and tech gadgets and maybe make a few bucks along the way, so I started there.
2. What am I passionate about?
You need to LOVE what you write about or you’ll burn out. Try to pick topics that you really like talking about. Blogging should never feel like a chore; your readers will know if you don’t really care.
3. What am I an expert in?
Know a lot about a specific field? Been in an industry for a long time? Chances are, you’ve got a lot of knowledge to share that others would find interesting.
The most important thing – just start!
Part of the adventure of blogging is that you don’t need to have it all figured out. If you’re stuck, just start writing about your hobbies or your daily life, and you’ll soon discover what you like writing about most.
STEP 2: Finding the Right Platform
Before you start blogging, you need to choose the platform you’ll use.
What’s a “platform, anyway?”
Building a blog used to be pretty complicated. You needed to know HTML (code), CSS, and a bunch of technical junk.
Thanks to platforms, none of that is necessary anymore. A “platform” is just a system that makes adding and editing content super easy and code-free, even if you’re not very technical.
Using a platform like WordPress is as simple as using Microsoft Word!
What platform do most people use?
Most of the blogs on the internet are made with WordPress – in fact, Wordpress has been used over 72 million times and is used by many popular blogs (including this one!)

I’ve tried dozens of different platforms out there, and…
I strongly recommend you use WordPress for your blog. Here’s why:
- It’s the easiest platform for beginners
- You can choose from thousands of awesome-looking templates and themes
- You can categorise your blog posts and create custom menus without knowing any code
- There are tons of awesome plugins you can install with one click that add features like newsletter signups, photo galleries and more
- Whenever you need help, there’s a HUGE community of bloggers and developers on WordPress who are happy to share
Why shouldn’t I just use a free platform, like tumblr?
I don’t want to go into too much right now, but if you are serious about blogging and decide to blog more than 2-3 months it’s strongly recommended to self-host your blog.
In that way you’ll have no limitations related to your blog content, images and videos. Your blog will look more professional, better looking and has tons of free features that you can add later on. Plus, youactually own your blog.
However, if you don’t plan to blog a for more than a month, free option might make sense.
How much will it cost to start a WordPress blog on my own domain?
Not much! All you need is…
- A domain name (web address) – About $10/year (I’ll show you how to get one for free)
- A hosting service (connects your blog to the internet) – About $3 – $6 per month.
That’s it – less than a movie ticket to use the best platform on your own custom domain.
What if I decide I don’t want to blog anymore?
If you decide blogging really isn’t for you, you can cancel any time. Most services even have a 30-daymoney-back guarantee, so you’ve got a full month to test it out without paying a dime.
I don’t have a domain name or host yet. What now?
In step 3, I’ll show you everything you need to do to get a WordPress blog up and running.
STEP 3: Setting Up Your Domain, Hosting & Blog
How do I pick the best domain name?
My advice? Get creative – but keep it simple. Make sure your domain name is…
- Brandable – Choose a domain name that reflects your style, attitude and subject. You might even choose to use your own name, like MikeWallagher.com
- Memorable – Nobody will remember “www.all-about-latest-fashion-trends.com”, but something like “welldressed.com” will stick in their heads.
- Unique – Ripping someone else off is no way to build a brand.
I prefer to pick something that either ends with .com, .net or .org, but sometimes the best domain names are already taken.
Where should I get my domain name and hosting?
I’ve used tons of different hosting companies. Some were good, some were… well, terrible.
Today, I use www.iPage.com for all of my blogs and recommend it to every new blogger I help.
Why iPage?
- Free domain name – If you sign up for hosting with the link above, you get a domain name thrown in for free
- Quite cheap – Really affordable compared to the competition (less than $2.99/mo)
- Easy set up – Setting up WordPress on iPage is ridiculously simple
- Fast – Other hosts loaded my blog verrrry slowly. I’ve never had a problem with iPage.
- 24/7 support – If anything happens, they’ve got great customer support by phone and email
Later in the guide, I’ll be showing you iPage’s set up process – but I’ve included a tutorial on how to install your blog manually as well, in case you decide to go with someone else.
One last note: If you go with a different hosting company, please make sure they offer unlimited bandwidth and unlimited disk space (like iPage does). That will help you to avoid problems later on.
How do I Install WordPress?
Once you’ve got your domain name and hosting, you have two options to install your blog to your own domain:
- A) With “One-Click-Installation” (iPage uses this – it’s so easy)
- B) Manually (A lot tougher)
The One-Click-Installation is better for beginners or those who are trying to set up their first blog. If you are internet/computer savvy then have a look at the manual tutorial. Either way, you’ll get your blog online very quickly.
Option 1: Set Up Your WordPress Blog Using iPage Hosting (EASIEST)
I’m about to show you how to buy a domain, set up your hosting package and get your WordPress blog set up using iPage.
Just like I mentioned earlier, iPage gives you a free domain name, super cheap hosting, great support and speedy load times – and they’ve been focused on bloggers since 2002.
Don’t worry – if you’ve already got a domain name, you can still use this guide.
Setting Up Your Hosting & Domain Name
NOTE: Follow the screenshots below to make sure you get the cheapest and most suitable package available.
You can enlarge the pictures by clicking on them.
1. Sign Up at www.iPage.com
Remember: Clicking the link above gives you the free domain name automatically when you check out.

This is the iPage homepage, where you can buy a domain name and hosting for your blog. Click on the “Sign Up Now” to begin the registration process – this will take you to the next screen to choose your domain name.
2. Choose your desired domain name and see if it’s available
If you’ve already bought a domain from somewhere else, tick “I plan to use a domain I already own“.

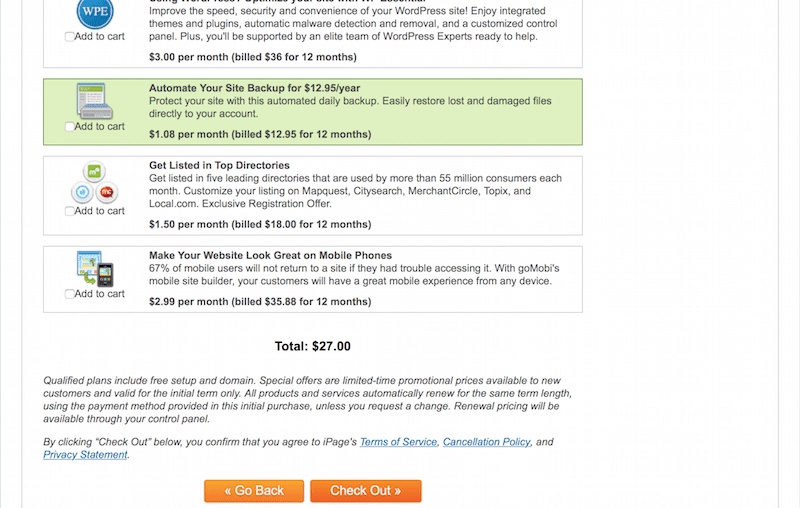
3. Choose your hosting package & options
Because you’re just starting out, the “Essential Hosting” will cover everything you need.
TIP: “Domain Privacy” is not crucial, but if you don’t want your name or phone number to be shared publically in the WHOIS database (a big database every host is required to send that information to), tick the box and it’ll all be hidden (the company will hide your details behind a proxy, so nobody can see who you are).
If you un-tick this option, you’ll save $9.99.

“Website Essentials” are not actually needed, iPage is secure enough, and they can help you with manual backups (if needed). Again, if you choose “No Thanks” for Automatic Backups, you’ll save another $12.
After that click “Check Out” and you have saved quite a lot of time and money.
“Website Essentials” are not actually needed, iPage is secure enough and they can help you with manual backups (if needed). Again, if you choose “No Thanks” for automatic backups, you’ll save another $12. After that click “Check Out” and you have saved quite a lot of time and money.
4. Complete the purchase
You’ll need to fill in your name and credit card details using iPage’s secure payment system to complete the purchase.
Be very careful to enter correct details so the customer support team can verify the registration and give you additional help if you need it.
Installing WordPress to your Domain
Now that you’ve got your hosting and domain name, you need to install the WordPress blogging platform.
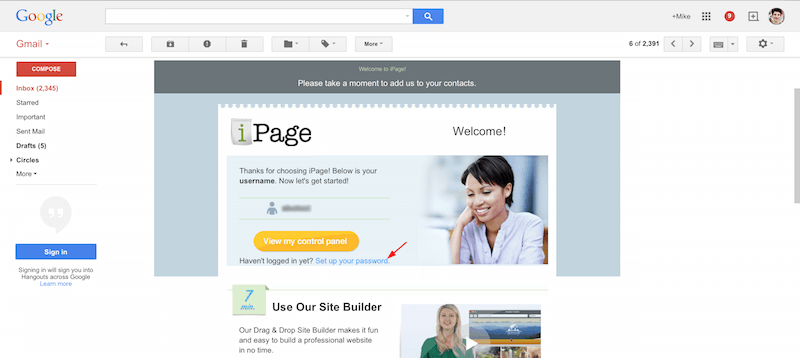
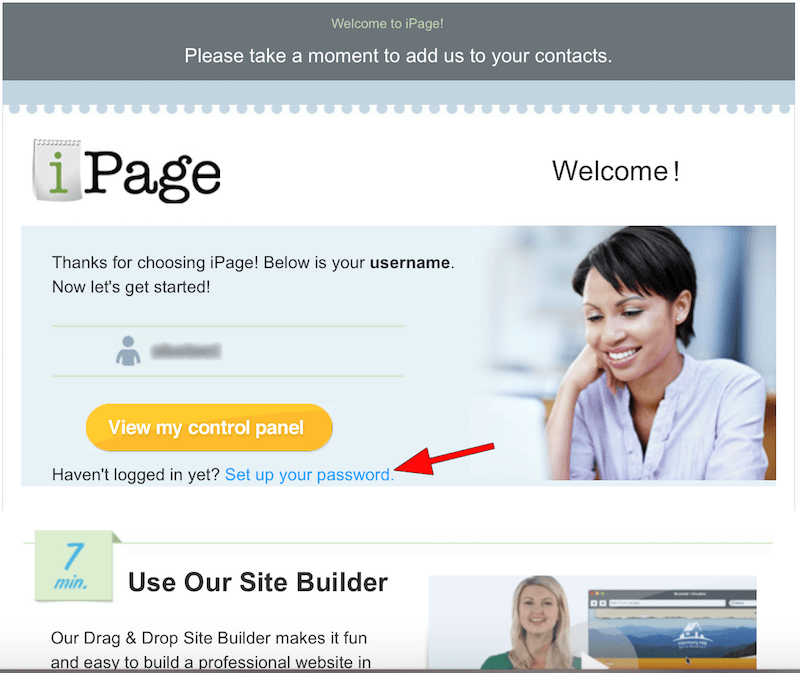
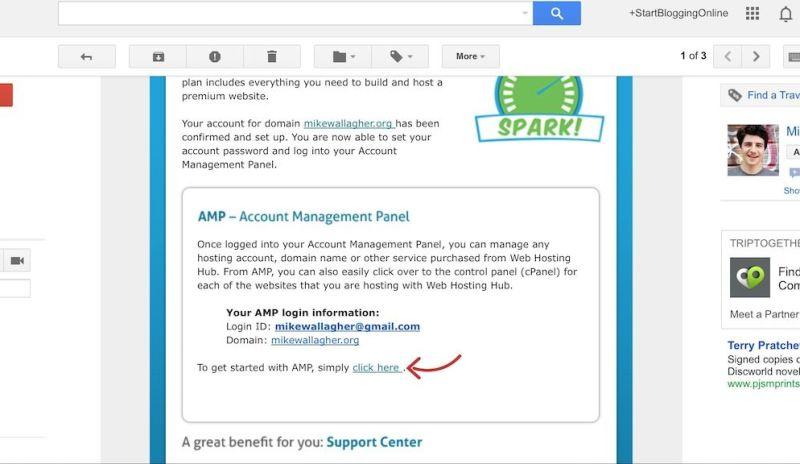
Within a few minutes of signing up, you should receive set up tutorials and your blog hosting account log in information in your email box (see below).
1. Create a New Username and Password
Choose your username and password carefully, and make sure you write both down somewhere!
2. Log into your account and click to enter the Control Panel.
The control panel looks like this:
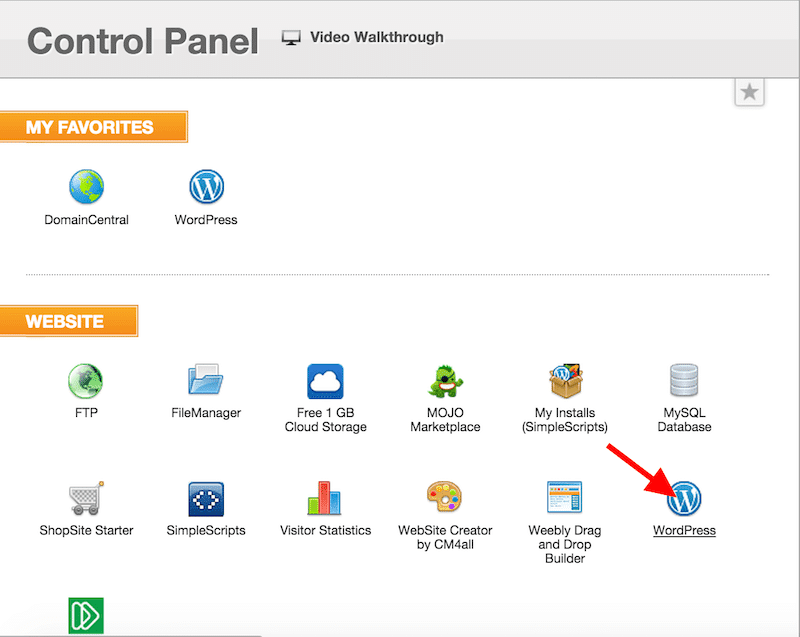
3. Click on the large blue icon called “WordPress”.
As soon as you do, you’ll see a page where you can install WordPress to your domain with a single click (see below)
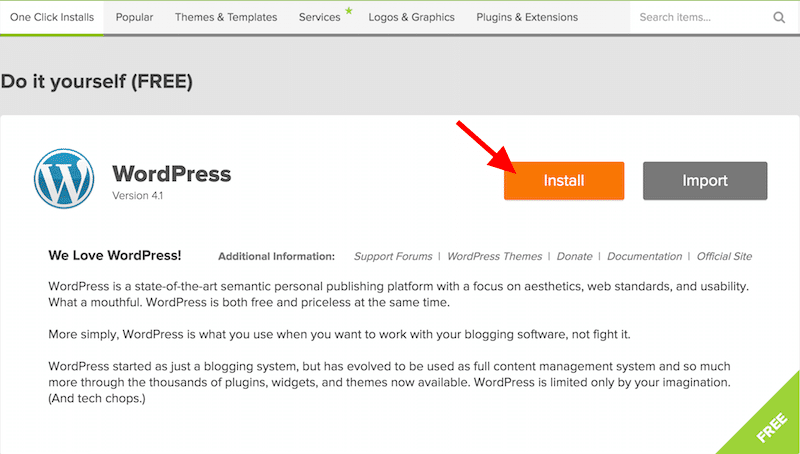
4. Install!
Click the “Install” button, and you’re almost done!
If you want to install your WordPress blog to your root domain (YourNewBlog.com), just click on “Check Domain”. If you want to install blog somewhere else (like YourNewBlog.com/blog), use the directory option.
iPage may ask you to overwrite some files – but that’s completely OK.

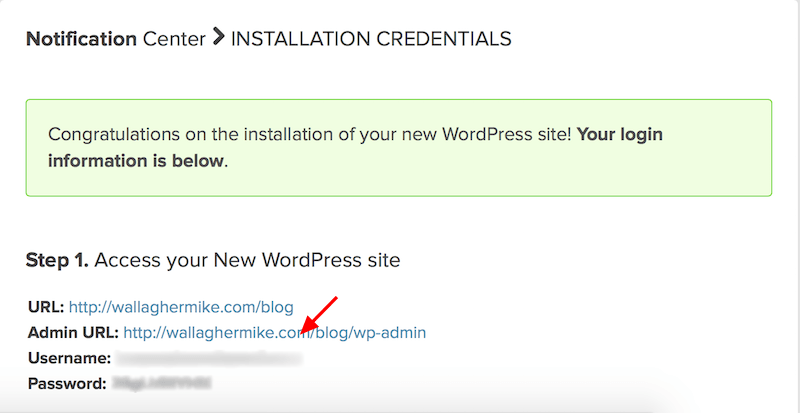
iPage automatically generates you a strong password that you can see right after you’ve finished the installation. You should receive it via email and you should also see it on your “Notification Center”.
You’re done!
Congratulations, your blog is now online! It’s a great feeling, isn’t it?
How to Log In:
When you are ready, use YourNewBlog.com/wp-admin to log in to your WordPress blog dashboard.
This should be your “default” WordPress blog after installation:

P.S: If you didn’t manage to install WordPress to your blog or you simply got stuck, feel free to contact their customer support. They can help you with the blog installation process over chat and phone.
Option 2: Set Up a WordPress Blog Manually to Any Host (ADVANCED)
In order to install your blog manually to any host, you need to know the following requirements:
- PHP 4.2 or greater
- MySQL 4.0 or greater
- At least 1GB free disk space
If your host meets the requirements, go and download WordPress from – http://wordpress.org/download
Once that’s done, you need to unzip the file to a new folder on your desktop. Make sure you do it properly; otherwise your blog installation will fail.
After that you need to look for a file (in the folder where you just extracted your WordPress.zip) named “wp-config-sample.php“. Once you’ve found it, You have to remove the sample and rename it as “wp-config.php“
After that open the file with WordPad (or Notepad) and change the following lines:
define(‘DB_NAME’, ‘database_name_here’); define(‘DB_USER’, ‘username_here’); define(‘DB_PASSWORD’, ‘password_here’); define(‘DB_HOST’, ‘localhost’); – In most cases you don’t have to change this. So at first you can leave it as it is.
If you don’t know your database name, username and password then ask your host’s customer support for them. Once you have edited the file, hit the “Save” button.
Now you need to connect to your hosting FTP account; you will need a FTP client (for example, FileZilla). Again, you will need to get your username and password from your hosting company. If you upload the files to the root directory then your blog will be accessible from www.yourdomain.com. If you upload files to a specific folder (for example myblog), your blog will be accessible from www.yourdomain.com/myblog. Make sure you don’t have any other “index” file (.html, .htm) in the directory as this can interrupt the whole installation process. You can only have index.php, which is part of WordPress.
Simple, hey? Don’t give up just yet, you are almost there. Now open your web browser and type in the following URL: www.yourblogaddress.com/wp-admin/install.php After that fill in the form (password, username and name of the blog) and click on the “Install WordPress” button. After that you are ready!
Once You’ve Installed: How to Choose Your Design, Write Your First Post and Promote Your Blog
P.S. Two last things:
1) If you found this tutorial helpful, I’d love it if you shared it using the links below. It really means a lot to me!
2) If you started a blog, you should definitely join to my blogging course, where I share tons of tricks, tips and advice you can use to get traffic, make money and create an amazing blog!
Simply click on the “FREE updates” at the top of my page and you’re on your way!